Pocket Pen

As mentioned in my previous post on pens I like to carry a writing instrument on me as part of my everyday carry. In school I always had a mechanical pencil, moving into pens I first tried roller-ball then felt-tip pens before landing on fountain pens. Fountain pens have many advantages over other types of pens, but being pocket safe is not one of them. Because they use liquid ink drips or leaks can cause a lot of damage (think of the opening to Shawn of the Dead). Last century wanting safety from leaky pens was such a necessity that people would line their shirt pockets with plastic envelopes bring us the dweebish stigma around the pocket protector. Luckily today the fountain pen enthusiast has better options.

A large point of not spilling your ink is how you are filling your ink. Older fountain pens used latex bladders or lever activated pistons to pull ink directly into the barrel of the pen. Now it is much more common to insert a small ink filled plastic cartridge or a converter which uses a screw piston. These ink distribution methods are much more reliable and will prevent ink from seeping out of the pen. But that’s not good enough for a pen that I want to throw in my pocked with my keys and other things.

DSC07372

The Liliput is nearly the perfect pocket pen. It adds protection by having a twist off cap that will never come off in your pocket, and will never let ink out. Coming in at a little under four inches capped its a pocket-able aluminium ink fortress. But its only nearly perfect. Being small, slippery, and perfectly round this pen wants to roll of and get lost. To be truly useful this pen needs a clip. There are clips make by Kaweco for this pen, though the selection is very limited. Instead I tried fabricating my own.

DSC07377

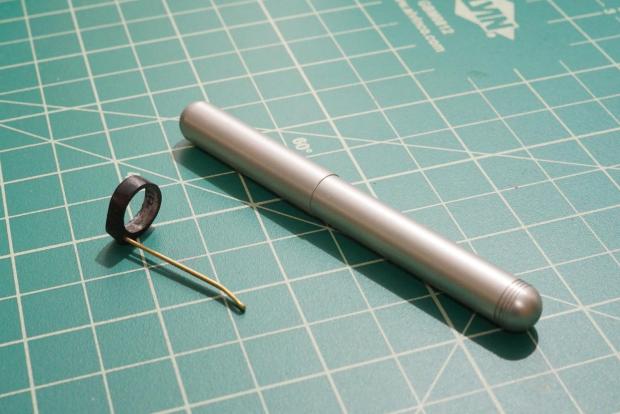
I have a 3D printer, but the nature of a pen clip makes it difficult to print on a 3D printer. Printing a ring to fit around the pen was easy enough, but attaching a clip to it introduces structural weakness that will not stand up to being pocketed over and over again. This has to do with the direction of layers, for the ring having the layers perpendicular to the pen makes printing the shape simple. For the clip the layers should be oriented parallel to the pen otherwise the clip will just snap off at the weak layer joins.

DSC07373

I printed the ring to fit around the pen and then looked to some model making techniques to finish the clip. I happened to have some very fine brass rods around that would make a durable, but flexible pen clip. Using a very small drill I made inserts for the ends of the brass rod and bent it them glued it into place. A little bit of sanding to smooth out the printed plastic and I have a very functional clip for my favorite pen.

DSC07375

Now this little pen is perfect for a pant for shirt pocket. With the oblong shape of the plastic ring it also no longer rolls away! With this clip I have been carrying the pen around for a few weeks now. Haven’t lost it and no spills! I’ve also got a rather odd way of filling this mini pen to maximize the amount of ink it will hold, but that’s a story for another time.

DSC07376

Computer Aided Design

Last week I finally upgraded my mobile computing unit. I am retiring my Lenovo T410, accepting it as the lemon that I put up with for 6 years.

With significant thought I settled on the Microsoft Surface Pro 4 for my upgrade. Since school I have dreamed of a computer with a pen that is good enough to take handwritten notes. Unfortunately all the computer-tablets that existed when I was in class were clunky and the pen input was never fast enough or accurate enough to truly take hand written notes. The claims of massive improvement on input with a pen is what has draw me towards the surface line.

I have been enjoying my surface immensely. It is by no means a perfect machine, as windows 10 still struggles a little in high DPI tablet form, but its almost exactly what I wanted 6 years ago.

2016-03-12 19.02.03

Some Sample notes

Microsoft encourages the use of their note taking application, OneNote, for use on the Surface for note taking and tout the pen integration in the application so widely that a long press of the pen’s eraser from anywhere in the OS will bring up OneNote. I have found that there is a much better note taking application (for me) that is, oddly enough, also made by Microsoft. The application ‘Plumbago’, Latin for lead, is a Microsoft Garage project, and application made by employees basically in their free time, and its is a much simpler but much preferred note taking application. The app just lets you create notebook with a wide variety of paper styles and then gives you 25 pages to write what ever you want in pencil, pen, or highlighter. Its pretty simple but what is does it does right, the controls are simple and intuitive and the pen integration is the best I’ve tried.

Just testing around a in a notebook with graph paper I started sketching the items on my desk and got the idea that I could raise my monitor a couple inches closer to eye level and remove the speaker amp from the rest of the clutter. So as I often do I started sketching designs for a little stand that would accompany the amp and provide a little storage. One I had a design I liked  I modeled is in SketchUp and printed it out on the 3D Printer.

monitorStand

Digital Sketchbooks!

By the morning after having the idea I had created and installed the monitor stand. It had gone trough a few iteration of design on ‘paper’ already moving form squares to hexagons. For a project taking a few hours its, so far, been working wonderfully.

Helping a Hand

I am the first to admit that most of my hobbies are realistically not the most efficient or effective way of handling something. Smart lighting and home automation are a convenience at best and really don’t provide enough utility to be a necessity; Sous-vide while amazing is not going to replace your stove or even a microwave oven; but this week I was able to take a step towards a future I hardly believe in, but many boldly claim might be an upcoming reality: home manufacturing.

With the popularity of 3D printers many media sources are calling this the start of the home manufacturing revolution. A new way of life that will be as big a change to our way of life as the industrial revolution. While I am very skeptical about this and building and operating a 3D printer has taught me that there are many, many obstacles in the way before this will be close to a reality. 3D printers today are very limited, very expensive, very slow and fairly unreliable, not to mention nowhere near as efficient as a large manufacturing run. But this week I showed myself that there is potential for a home manufacturing revolution.

As I spend most of every day sitting at a keyboard poor ergonomics and the cost of them is a real concern. Well it seems i had not been giving it proper attention as this week I started developing the wrist pain that comes from too much keyboard use. After aching through a day at work I came home and realized that I did not own a proper reinforced wrist brace to slap on until my wrist was better and I had made the necessary ergonomic improvements. While these can found online and in most drug stores I remembered a design I had seen that I wanted to try. 3D printing a wrist brace.

DSC00776[1].JPG

3D printed wrist brace

Modeling and digitally fitting a fully formed wrist brace would be a pain and would by very difficult and time consuming to print. This design, of which I found a few iterations online, is ingenious as it uses the relatively low melting temperature of one of the commonly printed plastics, PLA, to make printing and fitting much easier. The brace is modeled and printed as a flat piece and after a dip in near boiling water becomes malleable enough to be wrapped around a wrist. Once cooled it maintains this form and is stiff enough to provide support.

DSC00774[1]

The wrist brace being printed

DSC00775[1]

A flat and formed wrist brace

While certainly not as comfortable as a commercial wrist wrap it worked quit well. The model I chose had fitting s for Velcro to be used to hold the brace in place but I found wrapping a compression bandage around it worked quite well, though it covered all those pretty hexagons. The printing of each brace took a little under an hour and half and the forming took just minutes, all without leaving home. It may not have been modeled from a 3D scan of my hand but it held up for a few days until I manage to get a proper brace and it was and interesting talking point to all who noticed.

3D printers will probably not be as popular as the inkjet for decades to come, and editing a model in CAD will never be a simple a writing up a document, but there is potential for 3D printing and home manufacturing to replace as least some mass manufactured products.